How to add multiple users?

Learn how to efficiently add multiple users to ITILITE using the bulk upload feature. This guide will walk you through downloading the template, filling in user details, and uploading the file.
Interactive Guide
Follow these steps to add multiple users to your ITILITE account:
- From your ITILITE dashboard, navigate to Account Configuration > User Management.
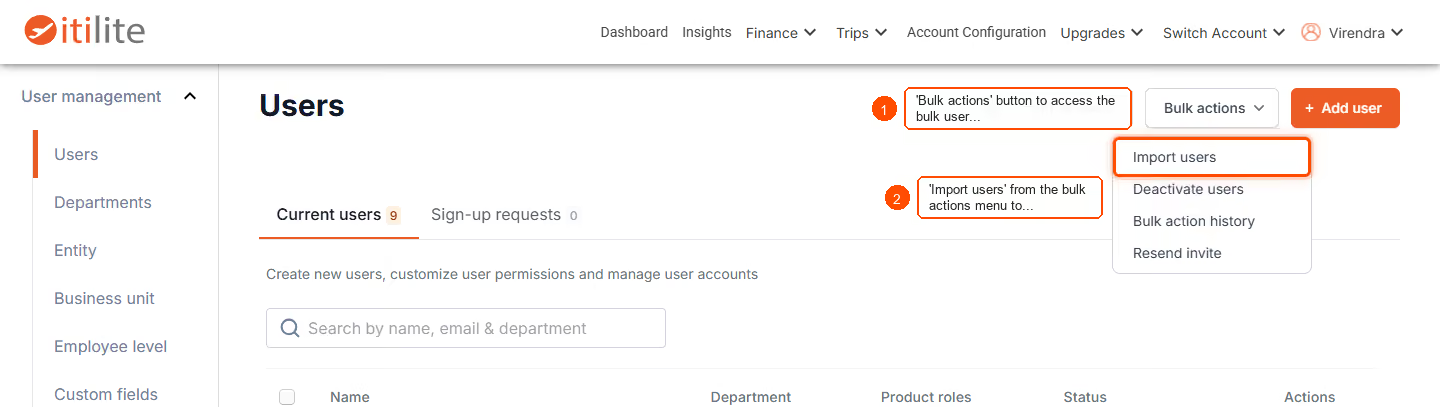
- On the Users page, click the Bulk actions button. From the dropdown menu, select Import users.
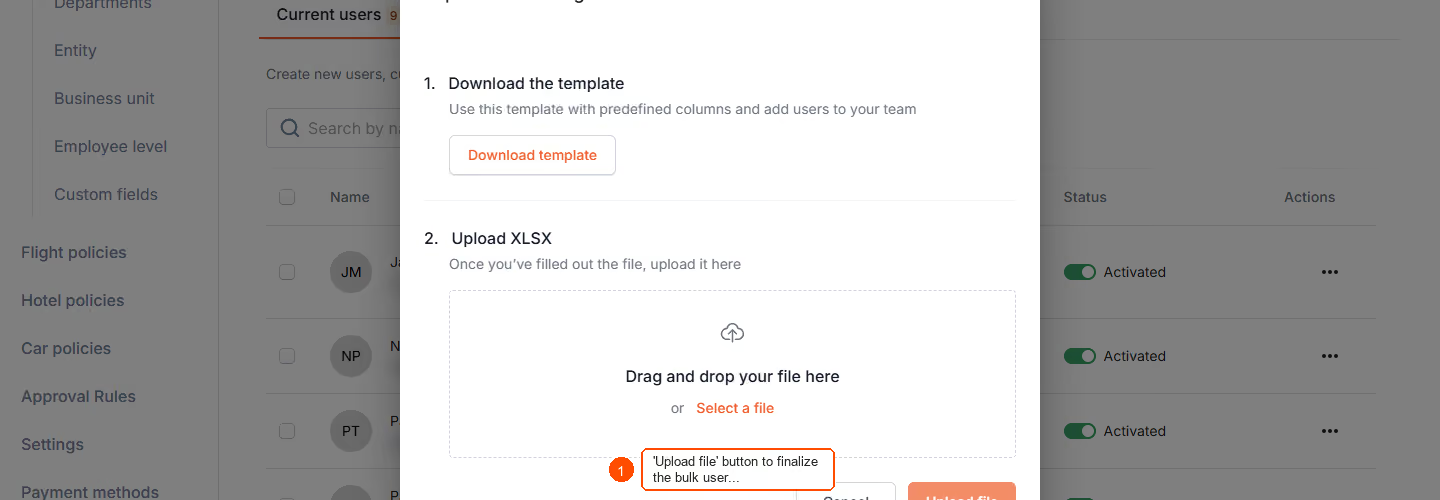
- Download the user import template to get an Excel file with the list of columns and usage instructions. Fill in the user information as required, and then upload your final Excel file.
- After selecting your file, click the Upload file button to finalize the bulk user import. You will see a confirmation once the users have been successfully imported.
Field name — Description — Example
First Name — First and middle name of the user. No numbers or special characters allowed. — Patricia A
Last Name — Last name of the user. No numbers or special characters allowed. — Lopez
Email — Company email address. — patricia.lopez@company.com
Travel (Yes/No) — Travel product access. — Yes
Expense (Yes/No) — Expense product access. — Yes
Employee Level — Must match one of the values configured in user management. — L6
Country Contact Code — Country code of phone number. Do not include '+' or '00'. — 1
Contact Number — Phone number without country code. — 6226226220
Card (Yes/No) — Corporate Card access. — No
Travel Role — Role for the Travel Product. ‘Traveler’, ‘Admin’, or ‘Finance admin’. — Traveler
Expense Role — Role for the Expense Product. ‘Submitter’, ‘Admin’, or ‘Finance admin’. — Submitter
Department — Must match one of the values configured in user management. — Sales
Entity — Must match one of the values configured in user management. — Company US
Business Unit — Must match one of the values configured in user management. — Cloud Services
Base Location — User’s base city. — New York
Employee Id — Unique internal identifier. Only al pha-numeric values allowed. — 293
Designation — User’s job title. — Strategy Manager
Currency — User will view all prices in this currency, using latest market conversion rates where required. — USD
Date Of Birth — User's birth date. — 1984-03-28
Gender — User's gender. — Female
Nationality — Citizenship/Nationality. — United States
Passport Number — Official passport ID. — H87245092
Passport Issue Country — Country that issued the passport. — USA
Redress Number — DHS Redress Control Number. Leave blank if not applicable. — 1234567
Flight Seat Preference — Preferred seating on aircraft. — Window
Flight Meal Preference — Preferred meal type. — Veg
Passport Expiry Date — Expiration date of passport. — 2028-01-28
Passport Issue Date — Date passport was issued. — 2023-01-29
Known Traveler Number — TSA PreCheck / Global Entry ID. 9-digit number usually. — 981234567
Travel approvers — Levels 1 through 10, to approve/ reject trip requests. — manager1@company.com
Travel FYI Approver — Notified of all requested trips. — manager1@company.com
Expense approvers — Levels 1 through 10, to approve/ reject expense reports. — xpns.apprvr1@company.com
Custom Fields — Values for custom metadata. — Project X
Pro-Tips & Guardrails
Note: The system first validates the uploaded data. Only records that pass validation can be inserted or updated. Invalid records will be rejected, requiring you to correct and re-upload them.
Pro-Tip: Ensure all mandatory fields like First Name, Last Name, Email, and at least one product access (Travel or Expense) are correctly filled. Employee IDs and Emails must be unique within your organization.
When filling the template, keep the following in mind:
- Product Access: For Travel and Expense, type exactly 'Yes' or 'No'. At least one must be 'Yes'.
- Roles: For 'Travel Role', choose 'Traveler', 'Admin', or 'Finance Admin'. For 'Expense Role', choose 'Submitter', 'Admin', or 'Finance Admin'. If left empty, 'Traveler' and 'Submitter' are assigned by default, respectively.
- Approvers: Enter the email of an existing user, or a new user included in the same bulk upload file. Approvers must have the necessary product access.
- Organizational Units: For fields like Department, Entity, Business Unit, and Employee Level, use the exact names configured in your ITILITE account. If your departments are not set up, you can enter 'NA' for Department and update it later.
- Partial Success: If some rows in your file contain errors, the valid users will still be created or updated, while only the invalid ones will be rejected.
- Invitation email: You can choose to send a welcome/ invitation email
Please note:
- Membership or loyalty program details cannot be uploaded in bulk as part of adding users.
FAQs
Q: What happens if some users in my upload file have errors?
A: The system processes valid records and rejects invalid ones. You will need to correct the errors in the rejected records and re-upload them.
Q: Who can use the bulk upload feature?
A: Only users with appropriate permissions, such as Travel Admin or Primary Admin, can use the bulk upload feature.
Q: Are there any required fields in the template?
A: Yes, mandatory fields include First Name, Last Name, Email, and at least one product access (Travel or Expense) marked as 'Yes'.
Q: Can I upload loyalty program details for users in bulk?
A: Currently, the bulk upload feature does not support adding membership or loyalty program details for users.
Q: Can I prevent invitation emails from being sent to new users?
A: Yes, there is an option to opt out of sending invitation/ welcome emails to newly added users during the bulk upload process.
Ready to take your Travel Management to next level
A fully integrated corporate travel management software that dramatically reduces spends while improving user experience